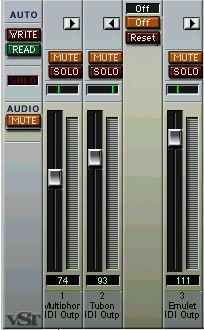
 Click this button to display the extended Channel Strip (see below).
 Mute button. Solo button. Pan control.
Volume fader.MIDI Output.
Each basic channel strip contains the following controls:
Clicking this mutes the corresponding Track in the Arrange window. This is a “mirror” of the Mute column in the Track List, which means that muting a Track in the Arrangement is reflected in the MIDI Track Mixer and vice versa.
Clicking the Solo button for a Track mutes all other Tracks in the MIDI Track Mixer. Tracks that are not visible in the MIDI Track Mixer (Audio Tracks, Chord Tracks, etc) are not affected by this.
Use this to control the Pan (stereo position) of a sound. When you change the setting, the pan value is displayed numerically below the fader.If you click on the arrow button at the top of a channel strip (MIDI Tracks only), the strip is extended to the right. Pressing [[Alt] and clicking on any arrow button will extend all Tracks.
The “Extended” Channel Strip for MIDI Track number 2.
Which controls are available in the extended area differs depending on the mode selected on the pop-up menu at the top:
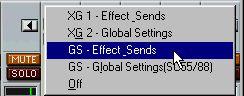
When you first install Cubase VST, the following modes are available (you can also add custom-made modes yourself, as described on page 315):
Mode namesThe controls in each mode are described below. For information about the XG, GS and General MIDI standards, see page 318.
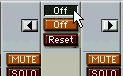
About the Reset and Off buttons
Regardless of the selected mode, you will find two buttons labelled “Reset” and “Off” at the top of the extended channel strip. These have the following functions:
• Clicking the Reset button will set all parameters to their default values, and send out the corresponding MIDI messages.
For most parameters, the default values will be zero or “no adjustment”, but there are exceptions to this. For example, the default Reverb Send settings are 64.
• Clicking the Off button will set all controls to their lowest value, without sending out any MIDI messages.
XG 1 - Effects & Sends
Control Description
Send 1 Send level for the reverb effect.
Send 2 Send level for the chorus effect.
Send 3 Send level for the “variation” effect.
Attack Adjusts the attack time of the sound. Turning the knob to the left shortens the attack, while turning it to the right gives a slower attack. Middle position means no adjustment is made.
Releas Adjusts the release time of the sound. Turning the knob to the left shortens the release, while turning it to the right makes the release time longer. Middle position means no adjustment is made.
Harm.C Adjusts the harmonic content of the sound. Middle position means no adjustment is made.XG 2 - Global Settings
In this mode, the parameters affect global settings in the instrument(s). Changing one of these settings for a Track will in fact affect all MIDI instruments connected to the same MIDI Output, regardless of the MIDI Channel setting of the Track. Therefore, to avoid confusion it might be a good idea to create an empty Track and use this only for these global settings. The following controls are available:
Control Eff. 1This is used to control the Master Volume of an instrument. Normally you should leave this in its highest position and set the volumes individually for each channel with the volume faders.
GS 1 - Effects & Sends
The following controls are available when the GS 1 mode is selected: Control Description
Send 1 Send level for the reverb effect.
Send 2 Send level for the chorus effect.
Send 3 Send level for the “variation” effect.
Attack Adjusts the attack time of the sound. Turning the knob to the left shortens the attack, while turning it to the right gives a slower attack. Middle position means no adjustment is made.
Decay Adjusts the decay time of the sound. Turning the knob to the left shortens the decay, while turning it to the right makes the decay longer. Middle position means no adjustment is made.
Releas Adjusts the release time of the sound. Turning the knob to the left shortens the release, while turning it to the right makes the release time longer. Middle position means no adjustment is made.
Cutoff Adjusts the filter cutoff frequency. Middle position means no adjustment is made. Reson. Adjusts the filter resonance. Middle position means no adjustment is made.
Press. Allows you to send out aftertouch (channel pressure) messages on the Track’s MIDI channel. This is useful if your keyboard cannot send aftertouch, but you have sound modules that respond to aftertouch. The default value for this parameter is zero, i.e. fully left.
Modul. Allows you to send out modulation messages on the Track’s MIDI channel. The default value for this parameter is zero, i.e. fully left.GS 2 - Global Settings
In this mode, the parameters affect global settings in the instrument(s). Changing one of these settings for a Track will in fact affect all MIDI instruments connected to the same MIDI Output, regardless of the MIDI Channel setting of the Track. Therefore, to avoid confusion it might be a good idea to create an empty Track and use this only for these global settings. The following controls are available:
Control Description• Write and Read buttons.
These are described in the section about automating your mix, see below.
• Solo indicator.
Lights up when you activate Solo for a Track. This serves to remind you that Solo is activated.
• Audio Mute button.
Clicking this button mutes all Audio Tracks. Click it again to unmute them. This feature is handy if you want to concentrate on mixing the MIDI Tracks.