All actions in the MIDI Track Mixer window can be automated in a very straightforward way: by “writing” them into a special “Track Mix” Part. When played back, this Part will repeat your fader and knob movements just like you performed them. You will even see the faders and buttons move on the screen, like on a physical mixer with motorized controls.
P
As described in the chapter “More about Play Parameters and the Inspector”, it is also possible to “automate” for example volume, simply by entering different volume values for different Parts in the Arrange window. Since these volume changes are not reflected in the MIDI Track Mixer, this could cause some confusion. Our suggestion is that you stick to one method at a time:
If you want to use the Volume and Pan settings in the Inspector, or if you want to insert “real” Volume and Pan Events in the Parts, don’t use the MIDI Track Mixer Automation. If you want to automate your mix in the MIDI Track Mixer, don’t enter any volume or pan settings in the Inspector or directly in the Parts.
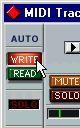
2. Click on the Write button in the upper left corner to activate recording. While this button is “lit” (activated), every volume, pan, mute or effect setting you make will be recorded.
3. Start playback.
4. Move the faders and pan controls as you would during a manual mixdown. Since you can repeat this recording several times, it is probably easiest to mix one or a couple of channels at a time, and stop and deactivate the Write function in between. That way, you can also Undo your last run if you’re not satisfied, using the Undo command on the Edit menu.
5. Stop playback.
If you check the Arrange window, you will note that a special Mixer Track called “Track Mix” has been created. This Track contains one long Part named “Track Mix”, in which all your MIDI Track Mixer actions are stored. Don’t worry about the length of this Part; it will automatically be lengthened if you record past its end.
Please note that there is only one Track Mix Part/Track, created the first time you use the Write function in your Arrangement. No new Parts are created the next time you use the Write function; information is added to the existing Part instead.
The Write function works in Stop mode as well as during playback. If you activate Write when Cubase VST is stopped, all changes you make to your mixer parameters are recorded at the current Song Position. This feature can be used creatively if you need initial mixer settings, abrupt changes, etc.
Undoing your recordingIf you select Undo from the Edit menu, all actions recorded since you last activated Write will be undone. Therefore, make it a habit to always deactivate Write after each recording “pass” and listen to what you recorded.
• If you find this too cumbersome, you can make separate Track Mix Parts for the different MIDI Tracks or recording “passes”, and edit/delete these afterwards. This is described on page 311.
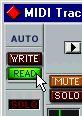
You may have Write and Read activated simultaneously, if you want to watch and listen to your recorded mixer actions while you’re recording fader movements for another mixer channel, etc.
3. Start playback as usual.
The faders and controls will move automatically, following your recorded actions.
1. Move the Song Position to before the section you want to re-record. If there are several mixer actions to re-record, it might be a good idea to set up a cycle around the section.
2. Activate the Write button and start playback.3. Click on the control you want to re-record, keep the mouse button pressed and move it as desired.
Keep the mouse button pressed during the whole section, even if you just want to set the control to a fixed value. This way, you make sure that all previously recorded control movements are overwritten.
Even if you automate the volume or pan for a MIDI Track, you can still make a manual adjustment by dragging the fader/pan control in the MIDI Track Mixer. Just remember to leave the Write function off, or your movements will be recorded “on top of” the already recorded automation.
• If you want to turn off MIDI Track Mixer automation from the Arrange window, you can mute the Track Mix Part or Track.
• You can copy recorded mixer actions to several places in your Arrangement by cutting out the relevant section of the Track Mix Part with the Scissors tool and duplicating it, placing the copies wherever you want them.
Working with more than one Track Mix PartAlthough Cubase VST only creates one dedicated Track Mix Track, there is a way to structure your Mixer Automation into different Parts for different MIDI Tracks, which makes it easier to edit and redo mixer recordings you’re not satisfied with:
1. Record your fader movements and other mixer actions for the first MIDI Track, as described on the previous page.3. Make a new Mixer Track.
It might be a good idea to give it a name similar to the MIDI Track you just mixed, to avoid confusion later on.
5. Open the MIDI Track Mixer again, activate the Write function and record your mixer actions for the next “channel strip” in the Mixer.
Now Cubase VST creates a new Track Mix Part on the original, empty Track Mix Track. If you activate the Read function, your previously recorded Part will be played back from its new Track, so you can watch your recorded fader movements while you continue with new MIDI Tracks.
6. Repeat steps 2 to 5 for as many channel strips as you like.
You will end up with a number of Mixer Tracks, all playing back simultaneously, affecting different MIDI Tracks in the MIDI Track Mixer. If you want to, you can keep it that way. If you like to clean up your Arrange window, you can put all the Mixer Tracks in a Folder Track (see page
132), or Merge the Mixer Parts into one (see page 56).
The Track Mix Part contains Mixer Events, which can be edited in the Controller Editor and/or the List Editor. The Controller Editor provides a graphic display and is very suitable for editing and drawing fader and knob movements. However, parameters with on/off values, such as the Mute buttons, can only be edited in List Edit.
Editing in the Controller Editor1. Double click on the Track Mix Part in the Arrange window.
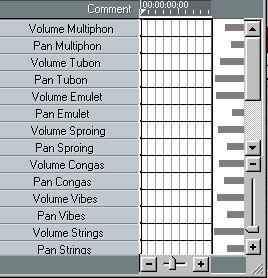
The Controller Editor opens. To the left, you will find all available parameters in the MIDI Track Mixer listed for each Track. A dot next to a parameter name indicates that there is data recorded for the parameter.
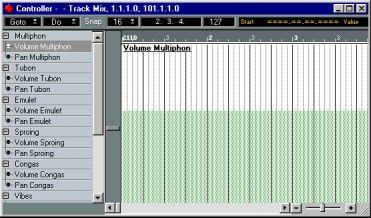
P Even though you only have recorded a single fader movement, you will find that all Volume and Pan parameters are marked with a dot. The reason for this, is that the first time you activate the Write function, the current values for all Volume and Pan parameters are written into the beginning of the Track Mix Part. All other parameters are only marked with a dot if they have been “touched” during the Write mode.
2. Select the parameter you want to display, by clicking on it in the list to the left. You can select several parameters by pressing [Ctrl] or [Shift] and clicking (see page 258).
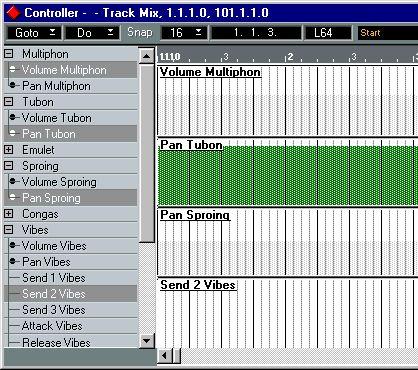 Now, the recorded mixer actions for the selected parameters are shown graphically to the right in the Controller Editor.
 3. Modify the mixer actions in various ways by using the tools, Cut and Paste, the functions on the Do pop-up menu, etc.
This is all described in detail in the chapter “The Controller Editor”.
4. Press [Return] to close the Controller Editor.
Editing in List Edit
1. Select the Track Mix Part in the Arrange window.
2. Open List Edit.
4. Locate the Events you want to edit, and change their values in the Value 2 column. For “switch” parameters such as Mute, value 127 represents “On” and value 0 represents “Off”.
• You can also use the Mask feature (see page 233) to display the Events for one parameter only, and edit these “graphically” in the Value 2 display to the right in the editor, if you wish.
This display shows Value 2 for each Event as a horizontal bargraph.