• Send effects
Up to eight send effects can be used. When you use send effects, audio is routed through the effect processors via independent Effect Sends for each channel, just like on a “real” physical mixer. The output from each effect processor is then routed to one of the buses or the master faders, where it can be mixed with the “dry” signal, if desired. These effects are mono instereo out.
• Insert effects
An insert effect is inserted into the signal chain of an audio channel, which means that the whole channel signal passes through the effect. This makes inserts suitable for effects for which you don’t need to mix dry (direct) and wet (processed) sound, e.g. distortion, filters or other effects that change the tonal or dynamic characteristics of the sound. You can have up to four different insert effects per channel.
• Master effects
Up to four stereo in-stereo out effect processors can be added to the signal on the master bus, the final stereo mix. Please note that there is no mixing of the dry/fx signals as there is with the send effects. Typical uses for master effects would be compressor/limiter effects, noise suppression units, etc.
The effect processors are entirely “virtual”, that is, they are all in software. A number of effects are provided with the program and additional effects can be purchased from Steinberg and third party vendors.
• For descriptions of the included effects, see the separate effect documentations.Activating Effects
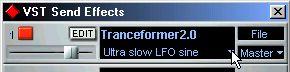
You select effect types and programs in the VST Send Effects window:
1. Pull down the Panels menu and select VST Send Effects.
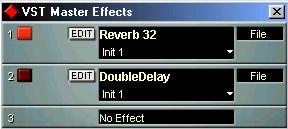
The VST Send Effects window opens. This resembles an effect rack, with up to eight separate “processors” arranged on top of each other. If you have less than eight effects selected, there will be a slot at the bottom of the window, labeled “No Effect”:
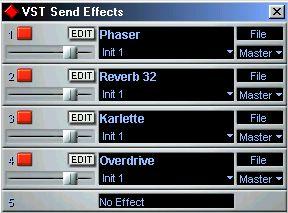 In this example, there are four effects activated.
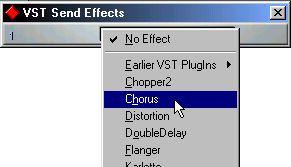
 In this example, there are no effects activated at all - only the “No
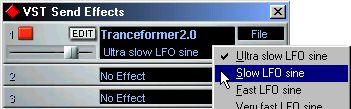
 2. Pull down the pop-up menu by clicking in the “No Effect” slot.
 Exactly which effect types are available depends on which VST and DirectX plug-ins (see page 484) are installed on your computer.
3. Select an effect from the list.
When you select an effect, the “No Effect” slot turns into a “normal” effect slot, and another “No Effect” slot appears below it in the window (provided that all eight effect slots aren’t already in use).
5. Make sure the effect output is routed to the desired Output Bus, by checking the bus pop-up (below the File pop-up).
The “normal” setting for this is “Master”. See page 510.
6. If you wish to activate more effects, repeat steps 2 to 5.
Remember that the Effects rely heavily on the CPU power in your computer. The more activated effect units, the more computer power will be used for effects.
Setting up the Sends
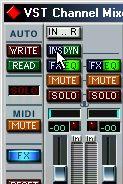
1. Open the VST Channel Mixer.
2. Click on the FX button for the audio channel you want to add effects to. The Channel Settings window opens, as described on the previous pages (you can also open this by clicking on the FX button in the Inspector). The section to the left of the EQ modules contains the effect sends.
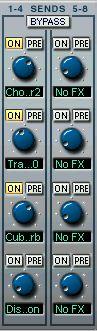 Bypass Button (affects all eight sends)
3. Make sure the “Bypass” button is not pressed.
When this button is pressed, all eight effect sends are deactivated for the channel. Click on it to turn the function on/off.
4. Click on the “On” button for one of the effect sends and turn the corresponding Send level knob to a moderate value.
5. Pull down the pop-up menu by clicking in the field below the Send level knob. This is the Send Routing pop-up menu, used for routing the send to the desired effect processor.
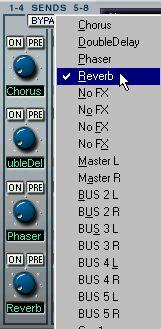 The first items on this menu correspond to the activated internal effects (up to eight) while the following items route the effect sends to Buses and Groups. See page 510 and page 463. 6. Select an effect from the pop-up menu.
7. If you want the signal to be sent to the effects before the faders, click on the Pre button for the send.
With Pre-fader effect sends, the amount of effect for the channel is not affected by the volume fader. With Post-fader effect sends (Pre button not pressed), the amount of effect is proportional to the channel volume, and will change with the volume fader movements.
8. If you want to use several effects for this audio channel, repeat steps 4 to 7 above for the other effect sends.
Make sure to deactivate all effect sends you don’t intend to use.
• You can open the VST Send Effects window by double clicking on the Send Routing pop-up menu field.
Making settings for the Effects
The final step is to select programs and make settings for the effect processors. Since you will probably need to adjust the send levels while doing this, leave the Channel Settings window open.
1. Use the Effects Master slider to the left on the processor panel to set the amount of input level to an effect processor.
 Effects Master slider
2. You can switch between different effect program presets by pulling down the Program pop-up in the VST Effects panel.
The number of program locations depends on the selected effect type.
 Clicking here...
...opens the Program pop-up.
• You can also edit the effect settings, as described on page 452.
P The effect settings can be automated, as described on page 473.
P You can turn all activated Sends on and off for a channel by clicking the Bypass button above the Sends in the Channel Settings window, or by right-clicking the channel’s “FX” button in the VST Mixer or in the Inspector.
You can apply up to four effects per channel. The signal passes through the effects in series from the top downwards.
Each Channel has its own Insert Effects
Each channel (and Group - see page 462) has its own set of four effects which are totally independent of the other channels. This means that (in a system where additional effect plug-ins have been added) Channel 1 can be routed through distortion, gating and compression, whereas Channel 2 can be routed through tremolo, compression and a spectral enhancer, etc.
Insert effects require the same processing power as any other effect type. This means that applying insert effects on many channels uses up far more processing power than the send effects (eight in total for the whole program). Remember that you can use the VST Performance window to keep an eye on the CPU load.
Which Effect Plug-ins can I use for Insert Effects?Most effect plug-ins will work fine as Insert Effects. In general, the only restrictions are with the number of Inputs and Outputs in the Effects:
• For a Plug-In to be usable as an Insert Effect, it has to have 1 or 2 inputs and 1 or 2 outputs.
This may seem obvious, but it is also possible to have effect plug-ins either with more than two inputs or outputs, or even no inputs or outputs at all. These cannot be used as Insert effects.
• For stereo audio channels, you need to use an effect with stereo inputs (e.g. one of the master effects).
It is possible to use a mono-input effect with a stereo channel pair, but then only the left channel in the pair will be processed, which is probably not what you want.
• For mono audio channels, you can use mono- or stereo-input effects. However, since the audio channel is in mono, the output of the effect will also be in mono. For stereo output effects, the left channel will then be used.
P For stereo Tracks, there will only be one INS button, for the left channel in the audio channel pair. However, both channels in the pair are routed through the Insert effect (provided it’s a stereo-input effect - see above).
The Channel Settings window opens. The Insert section is located to the right of the duplicate channel strip.
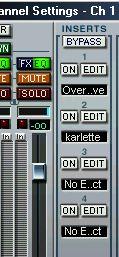
3. Select and activate an Effect, by clicking in the “No Effect” field.
4. If required, use the parameters in the effect’s control panel (see page 452) to adjust input level and balance between dry and effect signal.
Since the entire signal passes through the effect, you will only hear the “wet” (processed) signal on the output, unless you adjust the settings of the effect to make the output include some of the “dry” (unprocessed) sound as well.
5. If you want to, repeat steps 2-3 for the other effect processors.
Avoid activating effect processors that you don’t use, since this draws extra processor power. To minimize the processor load, pull down the Effect type pop-up for the unused processors, and select “No Effect”.
P The INS button in the VST Channel Mixer and the Inspector will light up for channels with Insert effects activated.
P You can turn all activated Inserts on and off for a channel by clicking the Bypass button above the Inserts in the Channel Settings window, or by right-clicking the channel’s “INS” button in the VST Mixer or in the Inspector.
1. Pull down the Panels menu and select “VST Master Effects”.
The VST Master Effect rack appears. You can also click the Master FX button in the VST Master window to open the Master Effects panel.
 2. Pull down the Effect type pop-up and select the plug-in.
The master mix signal is now routed through the plug-in.
4. Make settings for the effect.
This is done by clicking the Edit button to bring up a window with parameters for the effect (see page 452).
5. Repeat steps 3 and 4 for all effects you want to insert.
6. If you open the VST Master Mixer by selecting it from the Panels menu, or by clicking the Master “On” button in the VST Channel Mixer, you will find the name of the selected effect(s) in the Master Effect slots.
These are actually duplicates of the Effect type pop-up menus in the VST Master Effects window. Clicking on one of them pulls down the pop-up menu, allowing you to select another Effect without having to open the Master Effects window.
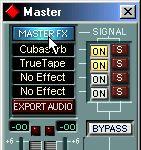
• You can switch individual Master Effects on and off in the Master Mixer by using the “On” buttons to the right of the Master Effect slots.
This turns the Power button on and off for the corresponding Effect in the VST Master Effect panel.
• You can solo one or more Master Effects in the VST Master Mixer by using the “S” buttons to the right of the Master Effect slots.
If a “S” button is activated for a corresponding Master Effect, any other activated Master Effects will be muted.
• You can save “Sets” of Master Effect configurations and settings, for use in other Songs.
This is explained on page 460.
• To completely deactivate a Master Effect (as opposed to just turning off the Power button), select “No Effect” for the corresponding slot in the Master.
Simply turning off the Power switch will still cause the effect to use some computer memory.
• Among the Master Effect controls in the Master Mixer panel, you will also find buttons for activating Dithering.
This is described on page 455.
Version 2.0 of the VST Plug-in standard allows plug-ins to receive MIDI from the host application (in this case, Cubase VST). Possible uses for this feature include tempo-based delays, MIDI control of pitch-shifters and harmonizers, etc. The following basic rules apply:
• If a VST 2.0 Plug-in that supports MIDI Input is activated, it automatically appears as a MIDI Output in the Arrange window.
To direct MIDI data from a Track to the plug-in, you simply select it in the Output column for the Track.
• MIDI Timing information is automatically provided to any VST 2.0 plug-in that “requests it”.
You don’t need to make any special settings for this.
Some effect plug-ins may have a certain delay, which will be noticeable especially when you use them as Insert effects. If you experience delayed audio playback from Tracks with Insert effects, you should activate Plug-In Delay Compensation in the Audio System Setup dialog. When this option is activated, the playback timing of the delayed Tracks is adjusted to compensate for the delay in the plug-ins.
P You may also need to activate this option when you are using the Channel Settings VST Dynamics panel. Even though these are not accessed as Insert Effects, technically they are just that, and may cause an audible delay.
In both the effect windows and in the Channel Settings you will notice a button labeled “Edit”. Clicking on the Edit button opens the selected effect’s control panel where you can make parameter settings.
Depending on the selected effect plug-in, this will open one of the following two types of control panel:• A “Standard” effect control panel.
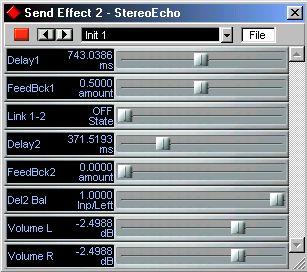
The left side of the panel contains the parameter name and current value, the right side contains sliders for changing each parameter value. The available parameters depend on the effect.
• A “Custom” control panel.
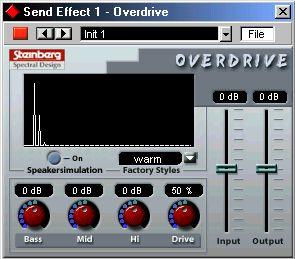 Other effects have custom windows for making settings.
• All effect control panels, custom and standard, have a Power button, a name field, a Program pop-up menu and a File pop-up menu.
Editing Standard Effects
• By using the Value Slider.
Press [Shift] while dragging the slider to set values in finer increments.
• By typing in a new value and pressing [Return].
This feature is only available for plug-ins in the VST 2 format.
Custom control panels may have any combination of knobs, sliders, buttons and graphic curves. For specifics about the included effects, please refer to the separate document “The Included Effects”.
P The Effect settings are saved with your Song. If you want to use your edited effects in other Songs, you can save and load them separately, as described on page 454.You can freely edit the effect parameters as described on the previous pages, and even name your edited effects. If you want to name the current settings, the following points apply:
• The basis for the current settings may have been a preset effect program, in which case there is a name in the Program Name field.In both cases, if you have changed any effect parameter settings, these are already saved! To name the current settings, click the Name field, type in a new name and press [Return]. The new name replaces the previous name on the Program pop-up menu.
1. Pull down the File pop-up menu.
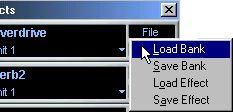
• If you want to save the current Program only, select “Save Effect”.
Effect Programs have the extension “fxp”.
• If you want to save all Programs for the Effect Type, select “Save Bank”. Effect Banks have the extension “fxb”.
2. In the file dialog that appears, select a name and location for the file. It might be a good idea to prepare a special folder for your effects.
3. Click Save.
You can load effects from disk for use in the selected effect processor: 1. Pull down the File pop-up menu.
• If you want to load a single Program only, select “Load Effect”.
• If you want to load a complete Program Bank, select “Load Bank”.
2. In the file dialog that appears, find and select the file you want to load.
3. Click Open.
If you loaded a Bank, it will replace the current set of all effect programs. If you loaded a single effect, it will replace the currently selected effect Program only.