This feature allows you to add “Outs” to a Track. An Out is an “invisible copy” of the Track, but with its own set of adjustable Inspector parameters. Outs can be viewed as extra outputs for a Track.
Initially when you add an Out, it is identical to the original Track, effectively doubling what the Track contains, using the same Inspector parameters. The new Out can then be set to a different MIDI channel or Output port, be transposed etc. You can add as many Outs as you like, all with different parameter settings in the Inspector. The only limit is how many voices are available in your MIDI instruments.
The Multi Out feature can only be used on Tracks, not Parts. Also remember that if an Out is set to the same MIDI channel (and Output Port) as the original Track, it cannot be set to play a different program. You can still change Inspector parameters such as Transpose, Velocity etc, but (logically) not the global Volume, Pan and Program settings as these cannot represent more than one value at a time (for example, a single channel can’t be panned both left and right at the same time).
P If the parameter settings in the Inspector window belong to a Part, it indicates this by showing “Partinfo” at the top of the Inspector window. In this mode, Multi Out cannot be activated, although any currently stored Out settings are still active.
For practical purposes, select Tracks with Parts that do not contain Program Change or other control messages when first trying out the Multi Out feature. If you disregard this “warning”, please remember that any added Out will copy these messages from the original Track, and that Program Change, Pan or Volume messages in a Part overrides the chosen values in the Inspector.
1. Select a MIDI Track.Make sure no Parts are selected.
2. Open the Inspector window and click on the Arrow button in the top right corner. The Extended Inspector area appears.
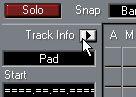 Click here to open the
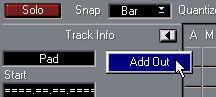
 3. Pull down the Multi Out pop-up menu in the top right section of the Inspector, and select “Add Out”.
Now, the Track name box in the Inspector has become a pop-up menu, and displays the original name preceded by a “+” symbol. If you pull down this pop-up menu, you will find both the original Track and the new Out listed there.

4. Double click on the Track name to rename the new Out.
All subsequent added outs are initially named ”+” plus the original Track name. It is recommended that you do rename each new Out, to help you identify it later on.
As mentioned before, the new Out is a copy of the original Track. You can use the Inspector parameters to change the Out in a number of ways. In this example, we will transpose the new Out up a fourth and have it play over a different MIDI channel:
1. Pull down the Track name pop-up menu and select the new Out.The name of the new Out should be displayed in the Track name box.
2. In the Inspector, set the Out to play over a different, unused MIDI channel.
3. Set the Transpose value to +5.
If you have activated the “Transpose MIDI with Mini-Keyboard” option in the Preferences– General dialog, drag the key 5 semitones up from the middle key.
...or enter a value by double-clicking in the transpose box.
4. Play a few notes on the keyboard, or start playback.
The Track now plays over two separate MIDI channels, and the new Out is also transposed up a fourth.
• To delete or mute an Out, first select it and then use the Multi Out pop-up menu to select the appropriate action.
For muted Outs, the “Mute” item on the pop-up menu is renamed to “Unmute”. Select this to unmute the Out.
 ...you can select unmute from the Multi Out pop-up menu. P
The “original” Out cannot be muted or deleted.
...you can select unmute from the Multi Out pop-up menu. P
The “original” Out cannot be muted or deleted.