This is where the various editors differ most. The different representations of Events are described in the chapter “An Introduction to MIDI Editing” in the Getting Started book, but there are some common properties worth pointing out:
Active and Inactive PartsIn Key, Drum and Score Edit, several Parts on different Tracks can be displayed at the same time. However, only one at a time is active. The active and inactive Parts are separated graphically. In Key and Drum Edit, notes belonging to an active Part are bright-colored or white (dark or black when they are selected, see below) and notes belonging to an inactive Part are dimmed. In Score Edit, different parts are put on different staves.
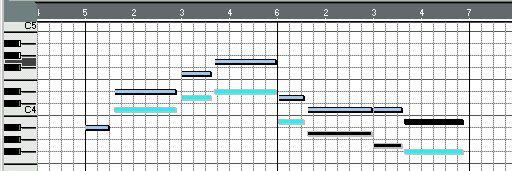 Selected notes.
• To activate a Part, click on any Event that belongs to that Part.
You can also use the Next/Previous Part commands on the Goto menu, which is convenient if the Part is empty.
Even though every MIDI message consists of single Events, the editors make a distinction between regular notes and what is called continuous Events. The Continuous Events (Pitch Bend, Modulation, Aftertouch and many others) have special displays in all editors except Score Edit. They are described separately in the Getting Started book and on page 189 in this chapter.
P Again, Continuous Events are often best viewed and edited in the Controller Editor, as described in the chapter “The Controller Editor”.The Playback settings you may have done in the Inspector are not visible when you edit the Part. This means that if a Part is transposed using the Inspector, it will be shown at its original recorded pitch in the editor, even though you will hear it playing back transposed.
• If this is a problem, use the “Freeze Play Parameters” function on the Functions menu. This function, explained in the chapter “Play Parameters, Part and Track Settings” in the Getting Started book, transforms the settings in the Inspector (e.g. a transposition) to “real” MIDI data (in the case of transposition, changed pitches for each note), visible and editable in the editors.
1. Pull down the color pop-up menu.
 2. Select one of the five options on the pop-up menu.
 The options are described below.
P Score Edit has a different color palette, which lets you choose colors individually for each note, much like you color Parts in the Arrange window.
Default No color is used for the notes.
The notes get the same color as their respective Part in the Arrange Window. Use this option when you are working with two or more Tracks in an editor, to better see which notes belong to which Track.
Editing ColorIf you have selected Channel, Pitch or Velocity colors, an extra item appears at the bottom of the pop-up menu. This is used for setting which colors should be used:
1. Select the option at the bottom of the color pop-up menu (named “Channel colors...”, “Pitch colors...” or “Velocity colors...” depending on what is selected). A Color dialog is opened. Channel, Pitch and Velocity have separate color dialogs, allowing you to set different color schemes for each color option.
The Pitch color dialog. There are twelve different pitch color steps (one for each semitone).
2. Choose colors for the velocity levels/pitches/channels, using standard Windows color selection.
See the Windows documentation for detailed information.